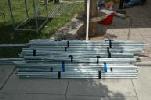
1250 feet of pipe go in.

250 struts come out.

And there's only a little waste.

pipe cutter.
Here is a practical example involving a 30-foot dome. We'll be building it from ten-foot lengths of metal conduit and we want to waste as little metal as possible.

After visiting Tara's Desert Domes Dome Calculator, we decide on a frequency-4 dome. We give the command
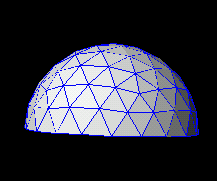
and create a basic frequency-4 dome. Then, the command
creates this strut list:
The next step is to find pairs of struts that can be cut from ten-foot lengths of pipe. In this case, it's trivial since all the cut lengths are five feet or less.
Most of the cuts are less than five feet, meaning that a lot of pipe will be wasted.
The next step is to try experimenting with larger dome sizes to see if we can reduce the waste and get a larger dome for the same amount of pipe, all while making sure we can always cut two struts from one pipe. A little trial and error finds a "sweet spot" radius of 16.047 feet:
Note that the A and B struts add up to exactly ten feet. This means that you can cut the majority of the struts with zero waste. As an added bonus, you create two struts with one cut.
A little more inspection will show that C and F struts can be cut from one pipe and that two D or two E struts can be cut from one pipe. Total waste is .47 feet, .16 feet, and .27 feet respectively. Also, there are ten more A struts than B struts, so you wind up with 10 wasted B struts.
Total requirement is 130 pipes to generate 250 struts. Total waste is 69 feet out of 1300.
| Pipes | Struts | Waste | |
|---|---|---|---|
| 70 | 70 A | 60 B | 0 |
| 10 extra | 4.853 × 10 | ||
| 30 | 30 C | 30 F | .47 × 30 |
| 15 | 15 D | 15 D | .16 × 15 |
| 15 | 15 E | 15 E | .27 × 15 |
But wait! Notice that the B strut is only about 1/8" shorter than the E strut. If you're willing to have slightly less margin on some of the struts*, you can convert the ten extra B struts to E struts. The cutting list now looks like this:
| Pipes | Struts | Waste | |
|---|---|---|---|
| 70 | 70 A | 60 B | 0 |
| 10 E | 0 | ||
| 30 | 30 C | 30 F | .47 × 30 |
| 15 | 15 D | 15 D | .16 × 15 |
| 10 | 10 E | 10 E | .27 × 10 |
This cutting list takes 1250 feet of pipe and leaves less than 20 feet of waste. No piece of waste pipe is longer than six inches.

1250 feet of pipe go in. |

250 struts come out. |

And there's only a little waste. |

pipe cutter. |
(Note: These measurements assume that the cutting process wastes no pipe. This is true for a pipe cutter, but a hacksaw or power saw would lose a small amount per cut -- include this in your calculations and make a slightly smaller dome.)
Next, we run the dome_layout program:
To produce this assembly diagram:

One final note: Design your cover before you actually settle on a size for your dome. You may find that the dome is just slightly larger than the size of your available cover materials, or that in sizing the dome to minimize waste of steel, you've set yourself up to waste a lot of cover material. Design your cover, and then see if you need to come back and redesign your frame.
(*Or you can reduce the dome radius slightly to 15.98 feet and make all the other struts 1/8" longer.)
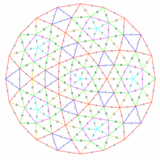
Next, we run the dome_cover program:
To produce this overall diagram:

This table:
And these individual cutting guides:

(You can download the complete pdf file of a similar dome (with doors) here.)
Don't let the complexity of this diagram scare you. Take a moment to admire the 5-way symmetry. Note that the diagram scale is distorted due to the constraints of displaying a spherical object in 2-d. The diagram is intended to show you how the individual triangles join together, and is not to scale. The cutting templates on the following pages are to scale and show you what the individual triangles look like.
One of the first things you want to do is create some full-scale cardboard templates based on the triangle diagrams created by dome_cover. Mark each template with the letter of the triangle it represents. Also mark each edge with the letter for that edge (most of the triangles are non-equilateral, so it matters.)
At first glance, you might think that the next step is to cut 160 individual triangles out of cloth and stitch them together. Not so. First, the effort involved in all that cutting and stitching would be unreasonable. Secondly, the seams where six panels join together at a vertex would be impossible to sew.
A somewhat better way is to buy your cloth in rolls slightly wider than the widest triangle you'll be working with (that's an F triangle in this diagram, by the way). Take the cover and divide it into logical strips and then lay out strings of triangles as shown below.
After that, it's a simple matter of sewing the strips together.


(Note: don't forget to leave seam allowances around all your triangle strips when you lay them out. The dome_cover program does not do that for you since it doesn't know how you're going to make your cover.)
Even cutting strips and sewing them together is frankly too much work. An even better way is to buy large canvas tarps.
For a 32-foot dome, you'll need five tarps 21 feet wide and 26 feet high. These tarps will be cut into wedges and then joined together at the edges (I recommend Velcro) to make the cover for your dome. Make sure the tarps have been pre-shrunk.


Take your cardboard templates and place them onto the tarp to lay out a 1/5 section of the dome cover. (Note that the end triangles on the bottom two rows are cut in half. Take another look at the cover diagram to understand why).
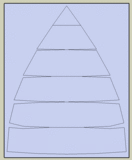
Your layout should look something like the diagram on the left. Mark around the triangles and you should wind up with something like the diagram on the right.
This is your cutting and sewing guide. The thin wedges between rows don't need to be cut; just form darts by matching the lines and sewing along them. Add a seam allowance to the outer edges and cut out the final wedge.
A small team can knock out one of these cover segments in less than a day.
Sections with doors or other extrusions will be more complicated, but the principal is the same. In some cases, you'll have to insert wedges of material rather than remove them.
See OasisDome instructions for a somewhat detailed set of assembly instructions. Bear in mind that your own dome is likely to have different labels for the struts and canvas panels, so be sure to substitute your own layout and cover diagrams for the ones in the instructions.